


Description
Automatic Water Level Indicator and Controller Using Arduino UNO
- Introduction to Automatic Water Level Indicator and Controller
- Components Used in the Project
- How the Automatic Water Level Indicator and Controller Works
- Step-by-Step Guide to Building the System
- Applications and Benefits
- Conclusion
Introduction to Automatic Water Level Indicator and Controller
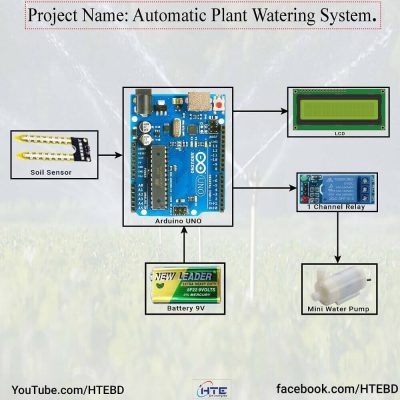
In this project, we’ll explore how to build an Automatic Water Level Indicator and Controller using an Arduino UNO as the main microcontroller. This project is designed to automate the process of monitoring and controlling water levels in a tank, ensuring efficient water usage and preventing overflow. The system uses an Ultrasonic Sensor to detect the water level, a 1-Channel Relay Module to control a Mini Water Pump, a Buzzer for alerting, and a 16×2 LCD with I2C for real-time display. Whether you’re a school student or an EEE final year student, this project is a perfect blend of learning and practical application.
Components Used in the Project
- Arduino UNO: The brain of the project, responsible for processing inputs from sensors and controlling outputs.
- 5V 5A SMPS (Switched Mode Power Supply): Provides the necessary power to the Arduino and other components.
- Ultrasonic Sensor (HC-SR04): Measures the water level in the tank by sending and receiving sound waves.
- 1-Channel Relay Module: Controls the Mini Water Pump based on the water level detected.
- Mini Water Pump: Pumps water into the tank when the level is low.
- Buzzer: Provides an audible alert when the water level is too low or too high.
- 16×2 LCD with I2C: Displays the water level and system status in real-time.
How the Automatic Water Level Indicator and Controller Works
The Automatic Water Level Indicator and Controller works by using the Ultrasonic Sensor to measure the distance between the sensor and the water surface. The Arduino UNO processes this data to determine the current water level in the tank. Based on the predefined thresholds, the Arduino then activates or deactivates the water pump via the 1-Channel Relay Module. If the water level falls below a certain point, the pump is turned on, and if the tank is full, the pump is turned off. Additionally, the Buzzer sounds an alert if the water level is critically low or if there is an overflow risk.
Step-by-Step Guide to Building the System
- Gather All Components: Ensure you have all the components listed above.
- Circuit Design: Start by connecting the Ultrasonic Sensor, Relay Module, Buzzer, and LCD to the Arduino UNO. The 5V SMPS powers the Arduino, which in turn powers the other components.
- Coding: Write the code to control the water level indicator and upload it to the Arduino. The code should include instructions for reading the Ultrasonic Sensor data, controlling the Relay Module, and updating the LCD display.
- Assembly: Assemble the components into your water tank setup, ensuring the Ultrasonic Sensor is positioned correctly to measure the water level.
- Testing: Power up the system and test the water level detection and pump control. Adjust the code if necessary to fine-tune the operation.
Applications and Benefits
This Automatic Water Level Indicator and Controller has numerous applications, including:
- Water Tank Management: Ensures efficient use of water by preventing overflow and ensuring the tank is always full.
- Irrigation Systems: Automates watering based on the water level, making it ideal for smart agriculture projects.
- Home Automation: Integrates with smart home systems to manage water usage effectively.
Benefits:
- Energy Efficiency: Automates the water pumping process, reducing manual intervention and saving energy.
- Cost-Effective: Utilizes readily available components, making it an affordable project for students and hobbyists.
- Educational Value: Provides hands-on experience with Arduino programming, sensor integration, and electronic circuit design.
Conclusion
Building an Automatic Water Level Indicator and Controller using Arduino UNO is a rewarding project that combines practicality with learning. Whether for a school project or a final year EEE project, this system offers a real-world application that can be expanded and improved with additional features. By following the steps outlined in this guide, you’ll gain valuable experience in electronics, coding, and project design.

Reviews
There are no reviews yet.