

Description
Arduino Gas Leakage Detector with Automatic Exhaust Control – The Ultimate Safety Project for EEE Final Year
- Introduction: Arduino Gas Leakage Detector with Automatic Exhaust Control
- Why Choose This Project for Your EEE Final Year?
- Components Required for the Project
- Circuit Diagram and Wiring Explanation
- Step-by-Step Implementation
- How the Arduino Gas Leakage Detector Works
- Benefits of an Automatic Exhaust Control System
- Applications of the Project
- Conclusion
Introduction: Arduino Gas Leakage Detector with Automatic Exhaust Control
The Arduino Gas Leakage Detector with Automatic Exhaust Control is a cutting-edge project designed to enhance safety in households and industries. It is an excellent choice for Electrical and Electronic Engineering (EEE) final-year students looking for a project that is both practical and innovative. By integrating a gas sensor with an Arduino UNO, servo motor, relay module, and an exhaust fan, this project ensures real-time detection of gas leaks and automatic activation of exhaust systems to prevent accidents.
Why Choose This Project for Your EEE Final Year?
Final-year projects are a critical milestone for EEE students, demonstrating their ability to apply theoretical knowledge to practical solutions. Here are some reasons to select this project:
- Practical Application: Gas leakage detection is essential for safety in homes, kitchens, and industries.
- Innovation: Combines Arduino technology with automation to solve real-world problems.
- Skill Development: Enhances skills in programming, circuit design, and hardware integration.
- Future Scope: Can be expanded into IoT-based solutions for smart homes.
Components Required for the Project
To build the Arduino Gas Leakage Detector with Automatic Exhaust Control, you will need:
- Arduino UNO
- MQ-9 Gas Sensor
- 1-Channel Relay Module
- Servo Motor
- Exhaust Fan
- Buzzer
- 9V Battery
- Jumper Wires
- Breadboard
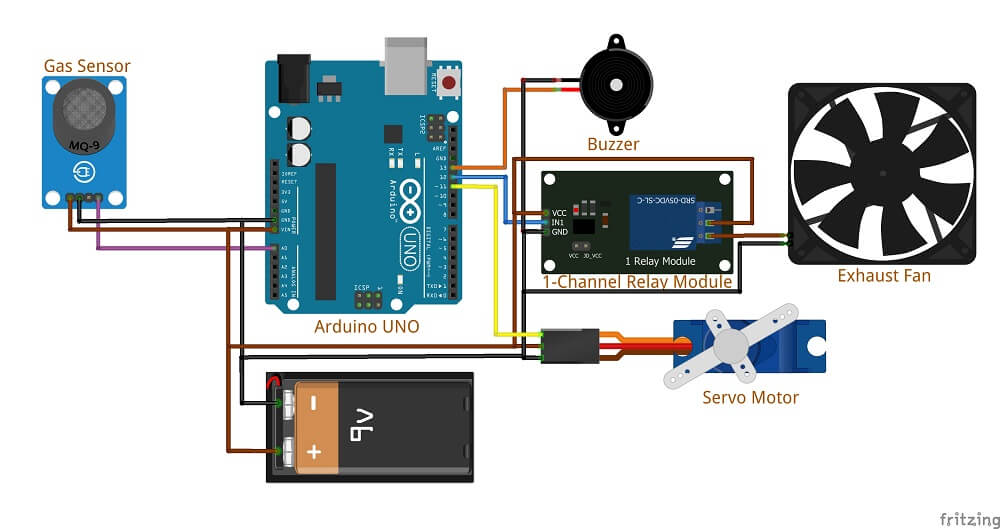
Circuit Diagram and Wiring Explanation
The circuit connects the MQ-9 gas sensor to the Arduino UNO for detecting gas concentrations. A relay module is used to control the exhaust fan, and a servo motor is integrated to control a gas valve (optional). The buzzer provides an alarm system when a leak is detected. Below is a detailed diagram and wiring explanation:
Key Connections:
- MQ-9 Sensor: Connect VCC to 5V, GND to GND, and DO (Digital Output) to Arduino PIN D2.
- Relay Module: Connect VCC and GND to Arduino, and IN1 to PIN D3.
- Buzzer: Connect to PIN D4.
- Exhaust Fan: Connected through the relay module.
Step-by-Step Implementation
1. Set Up the Hardware
- Connect the components as per the circuit diagram.
- Use the breadboard for temporary connections and testing.
2. Write the Arduino Code
#include <Servo.h>
Servo servo;
int gasSensor = 2;
int relayPin = 3;
int buzzer = 4;

void setup() {
  pinMode(gasSensor, INPUT);
  pinMode(relayPin, OUTPUT);
  pinMode(buzzer, OUTPUT);
  servo.attach(5);
  servo.write(0);
  Serial.begin(9600);
}

void loop() {
  int gasValue = digitalRead(gasSensor);
  if (gasValue == HIGH) {
    digitalWrite(relayPin, HIGH);
    digitalWrite(buzzer, HIGH);
    servo.write(90); // Close gas valve
    Serial.println("Gas Leak Detected!");
  } else {
    digitalWrite(relayPin, LOW);
    digitalWrite(buzzer, LOW);
    servo.write(0); // Open gas valve
    Serial.println("No Gas Leak.");
  }
  delay(1000);
}
3. Test the System
- Simulate a gas leak using a lighter (without flame) near the sensor.
- Observe the fan activation, buzzer sound, and servo movement.
4. Finalize and Enclose
- Mount the components on a PCB or a sturdy base.
- Enclose in a protective casing for safety and durability.
How the Arduino Gas Leakage Detector Works
The MQ-9 sensor detects the presence of gases like carbon monoxide or LPG. When a gas concentration crosses the predefined threshold, the Arduino activates the relay, turning on the exhaust fan. Simultaneously, the buzzer sounds an alarm, and the servo motor (if included) shuts off the gas supply.
Benefits of an Automatic Exhaust Control System
- Enhanced Safety: Quickly removes harmful gases from the environment.
- Automation: No manual intervention required.
- Scalability: Can be integrated with IoT platforms for remote monitoring.
- Cost-Effective: Affordable components make it budget-friendly.
Applications of the Project
- Home Safety: Detects gas leaks in kitchens and activates ventilation.
- Industrial Safety: Monitors gas levels in factories and chemical plants.
- Smart Homes: Can be integrated with home automation systems.
- Education: Ideal project for demonstrating Arduino-based automation.
Conclusion
The Arduino Gas Leakage Detector with Automatic Exhaust Control is a practical and innovative project that addresses critical safety concerns. It provides an excellent opportunity for EEE students to showcase their technical skills and creativity. With potential for future enhancements like IoT integration, this project is a stepping stone to building smarter and safer environments.
For more details on Arduino-based projects, check out Arduino Project Hub.
Internal Link: Learn more about Final Year Project Ideas.
Reviews
There are no reviews yet.